

How To Take Professional Makeup Pictures
Whether you're selling makeup through your ecommerce site, showcasing products through your weblog, or marketing your services as a makeup creative person, quality corrective photography can brand or interruption your sales.
When purchasing makeup online, customers don't have the benefit of trying on the product. Photographing products and models correctly helps your clients visualize the finished look, increasing sales and reducing returns.
We make information technology easy to get new clients and echo business with all the marketing tools you need for your nails, hair, peel, or personal intendance business.
Why cosmetic photography is important for beauty bloggers and retailers
Whether you're shooting cosmetics for your weblog or ecommerce sales, quality corrective photography is essential. Shooting products with proper lighting conditions gives clients a realistic impression of production color when shopping online.
Past photographing beauty products and swatches correctly, yous can make it easier for your customers to cull colors they will similar. Thankfully, you lot don't take to be an expert photographer to take good pictures of your products and swatches — you just demand to know a few tricks.
v tips for taking a good makeup product photo
1. Use the right light
Since you want your photos to accurately represent each product, natural low-cal is the best for corrective photography. If you tin, ready your shoot next to a large window in the middle of the day. If you're shooting products in the evening or in low low-cal atmospheric condition, utilise a reflective screen or a flash diffuser zipper to even out the low-cal.
Natural light will create the right residuum of highlights and shadows on your production while keeping it soft and natural. Harsh lights can bounce off reflective surfaces on the packaging, and hard shadows can misconstrue the epitome.
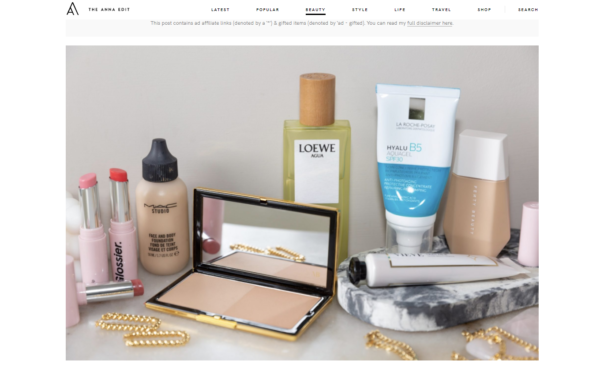
This mail on The Anna Edit blog features some of the blogger'due south favorite products. In the mirror, y'all tin see a reflection indicating that this image was nearly likely shot near a window. All shadows in the image are soft, letting the products stand up out.
2. Clean your makeup
If you're a blogger, you've probably tested out the makeup serving every bit the discipline for your blog mail service. If you're shooting product photos to upload to an ecommerce site, you lot might choose to liven up the background with product swatches.
After yous're done using the production, make clean it. Wipe any excess product off the packet. Sharpen pencils and make sure you're using fresh lipsticks (if you swatch the colour, apply an old tube to create the swatch and a new one in the photo.
Clean products await fresh and new, which volition make them more appealing to potential customers.
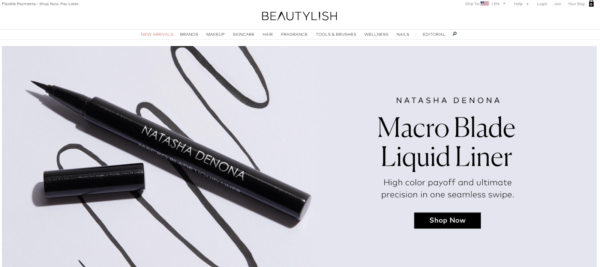
Beautylish, an online beauty retailer based in San Francisco, posted the image above on its website landing page. Information technology features a liquid liner that has been swatched on a slice of paper to showcase the product. Even though the product has been opened and used to create the epitome, the eyeliner pen itself is make clean and free of fingerprints and makeup.
iii. Play with your composition
When y'all're shooting a line of cosmetics for ecommerce, it's more often than not best to use a white background. Most cosmetic photography for ecommerce features the production on its own against a white background. Shooting your products on a white background lets yous hands edit out the background if yous demand to. Most importantly, a white background lets the colors of your product pop without competing with other elements of your image.
However, using an interesting composition with background objects or bold colors in your product images can assist them stand out when you want them to. An interesting groundwork can amplify your social media posts and accentuate products displayed on your landing page. If you're featuring a new production or want to draw attention to one that isn't selling, consider creating a more engaging layout.
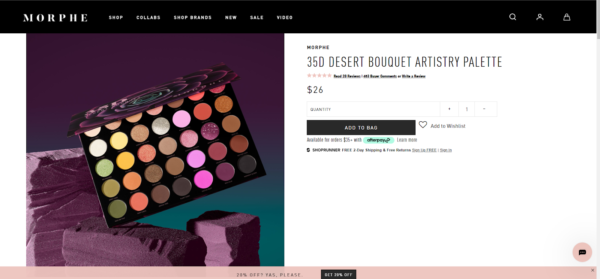
Morphe displayed its new 35D Desert Bouquet Artistry Palette using a unproblematic dark background with dark purple foam pieces sculpted to resemble the desert. The composition is simple, however the hitting, rich colors complement those in the palette and draw their eye toward the colors themselves.
Use background objects and colors that accentuate your products, just continue it elementary. A busy composition with an abundance of background objects might draw the middle abroad from your product. You want to keep the focus on the product, not the other objects in the photo.
4. Brandish your labels and colors
Corrective photography on an ecommerce site is like to visual merchandising in stores, and the same principles utilise. When you lot're walking through a makeup shop, all products will be displayed on the shelf with the labels out.
Tester products are usually displayed with the lid open or removed and then customers tin can see the colors. On your website, product photos should be shot similarly to how they would exist displayed on a shelf. Brand sure labels are clearly visible.
When it comes to palettes and other products, it's best to photograph them with the hat open up and the product out, so customers can see what'due south inside.
Muse Beauty displays front-facing products on its website. Some of the lip colors are closed, but yous can still see the color through the packaging. Others are swatched, so the customer tin can see the color and product consistency.
v. Be consistent
Dazzler product photography lets yous exist artistic with your styling. You can play with filters and different exposure settings on your photographic camera until you find the combination that suits your style. Just in one case you've establish a style that works, information technology's important to keep it consistent.
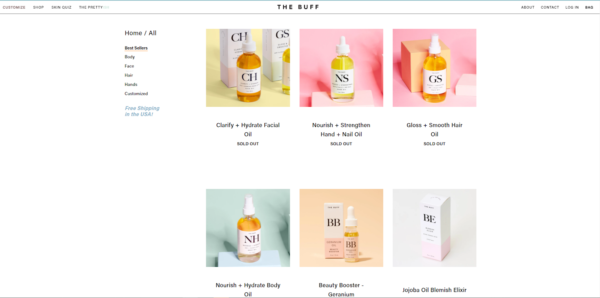
The Buff, a customizable skincare and makeup brand, sticks with a minimalist composition for its products. Each product is shot in front of its packaging or another box, and they are set against a pastel groundwork that contrasts with the product'south color.
Your corrective photography volition become a key function of your make over time. Being consequent with your compositions will help y'all establish a clear aesthetic and build brand recognition.
Once you've used these tips to design your composition, information technology'southward fourth dimension to prepare upwards your shot.
How to set up a production shot
Beginning by considering the lighting. If y'all're in a location with natural low-cal, ready upwards your shoot near the window. Shoot at a time when the calorie-free is non streaming direct through the window, but rather serving every bit a soft, natural light source.
If y'all're shooting with a white background, you can use a white sheet, white foam core, or a product properties. You can purchase an inexpensive photo studio box to brand sure you lot have the right rest of low-cal and shadow.
Next, adjust your background objects and identify the production front and center within the shoot. Instead of shooting your production head-on, shoot from a slightly higher angle. Doing so will make your product announced as though y'all shot it head-on, simply the shadows will be softer, and any hidden styling elements (such every bit adhesives used to secure products to the set) won't exist visible in the final photo. Have multiple shots so y'all accept several from which to cull.
For creative compositions, shoot from multiple angles. When you're looking through images later on, you might find a standout that you wouldn't have captured if you stuck with i vantage point. Once you lot've finished shooting the production, brand swatches.
How to take an accurate makeup swatch photo
Including makeup swatch photos on your website gives customers an idea of what the product volition look like on them. It'south of import to take accurate swatch photos and so clients will know what to look when their order arrives. If they receive a product that doesn't await annihilation like the swatch, they will probably return it.
one. Use multiple models
Exist sure to use multiple models with a multifariousness of different peel tones. This will help customers of all ethnicities become a better understanding of how your production will expect on their pare. Yous tin swatch multiple products on each model. Swipe different colors in a line downward each model's arm, making annotation of each then you can label them in post-production.
2. Determine if y'all need a primer
Take a variety of examination shots with and without makeup primer. Load the photos on your computer and determine which most closely friction match the color. If you decide to use a primer, use a colorless one or a formula that matches each model'southward skin tone so you don't dilute the makeup colour.
3. Cull your light
As with product photos, information technology'south best to accept swatches in natural low-cal. If you demand to take your swatch photos in lower light weather, pay attention to your lighting source. Many interior lights give off a yellow hue which can distort the color of your swatches.
Find a ring calorie-free or another lighting source developed specifically for indoor photography, and avoid lighting your swatches direct. Instead, set the light upwardly to bounce off a screen or employ a wink diffuser which you can attach to your flash to redistribute the light.
4. Make clean your swatch surface
The about common identify to swatch makeup is on the forearm, as it's easy to photograph and generally has a skin tone close to that of the face. Prep your models by washing and exfoliating their forearms. Apply a sugar scrub or similar production to make sure no grit or dirt volition distort the colors.
5. Make your swatches
Make fifty-fifty swatches that are the aforementioned size and keep them straight. The easiest way to create similar swatches is to use a stencil or other straight edge to guide y'all. If you need to, use makeup remover to clean up the edges.
6. Have the photos
With everything prepped, have your model place their forearm in the light and against the backdrop. Shoot each model from a variety of angles and accept multiple photos and then you have many from which to choose. You can also photo all of your models side-by-side and so customers can match the products to their own skin tone.
Tips for skillful lighting for beginners
Lighting is the most important component of adept photography. Incorrect lighting tin can crusade your images to look washed out or overly dark. It can distort the colors in your image. Cosmetic photography is all most showcasing the specific colors of each product, so you want your colors to exist as accurate as possible.
As always, the most constructive lighting source is natural lite. Shooting in straight sunlight at high noon will distort your image, creating harsh shadows and potentially odd contours within your image. For production photography, the best light atmospheric condition are achieved exterior on an overcast day.
The best fashion to learn how to light your photos is to do. If you have a professional camera, accept it out at different times of day and take a variety of pictures to meet how objects appear in different lights. You can besides shoot production photos with the camera on your phone. If you're using your phone, practice shooting different household objects under unlike lighting weather.
1. Train yourself to evaluate tone
Different lights accept different undertones, which impact the expect of corrective photography. Your living room lamp probable gives off a warm tone, which can make photos look more yellow than they would under natural light. A fluorescent light or other commercial lighting source might emit a cooler tone.
Get-go taking photos of white walls or a piece of paper under different lights. Load the photos into your reckoner and open them with a photo editing program. You should exist able to tell if the lighting is cool or warm based on how information technology looks in a plan like Photoshop.
two. Focus on your nigh dominant low-cal source
When y'all're staging your photoshoot, it's important to control your primary lighting source. For example, if you're shooting outside, your main calorie-free source is the sun. Yous can control how your subjects expect by using reflective screens or diffusers to point sunlight toward your subject field and soften the shadows.
iii. Bring your own light source
With the rise of social media and video conferencing, lighting sources are increasingly accessible to beginners. Offset past picking up a ring light and a diffuser attachment for your flash. Prepare the lite at an bending instead of situating it directly in front of your field of study. Placing your calorie-free on the side volition keep it from creating harsh shadows.
iv. Support
When you're starting out, you lot might have a tendency to place your light source too close to your subject. If you're photographing a person, this tin can result in glare or cerise eye. In corrective photography, lighting from the wrong angle tin can distort highlighting and contouring.
In cosmetic photography, placing a light source too close can create reflections. If you're shooting a glass production similar a perfume or foundation canteen, the light tin can bounce off the product, creating spots in your photo. Moving your light source further away will aid convalesce any glare.
You might not notice lighting issues correct abroad. They're commonly more apparent when you lot've loaded your pictures onto your computer and tin look at them on a bigger screen.
If you have a digital photographic camera, you can annul the light by adjusting the settings on your camera. You might be tempted to use your automatic settings, but learning how to get the near out of your photographic camera will save editing time and better your stop result.
3 essential photographic camera settings for beginners
All photographs are created with light. In pic photography, cameras employ a shutter and a pocket-sized mirror to direct light into the camera, which exposes the film. The objects in the mirror crusade the film to expose at different levels, which in plow creates the prototype that you encounter on the terminal impress.
Digital cameras work with the same principle, in that you lot are controlling the amount of low-cal that enters your camera to record an prototype. In that location are 3 settings that will assist you lot manipulate how much lite enters the photographic camera.
1. Aperture
Your aperture is the diaphragm that is attached to your lens. When you gear up the F end on your camera, it tells this diaphragm how much or how little to open. If the number is larger, then the discontinuity is smaller, meaning less calorie-free is inbound your camera.
In low-light situations, y'all want to utilize a smaller aperture number to let more than light into your camera. Using your F finish settings makes it easier to create blurry backgrounds, letting a viewer focus on your subject.
Product photography often makes use of low or medium aperture, considering it more often than not creates better depth of field. Practice taking pictures of the same object with a dissimilar F terminate setting to see how information technology impacts the final image.
1 drawback to using a larger F stop is that these settings require slower shutter speeds, which runs the adventure of blurring your epitome, especially if you shake or motion when taking the photograph. To avoid this issue, employ a tripod on product shoots.
2. Shutter speed
Your digital camera also lets yous adjust the shutter speed. This setting refers to how long the shutter remains open, exposing the camera's interior to light.
When taking photos in natural light and outside, faster shutter speeds volition produce the best results. If y'all're using a longer shutter speed in an outdoor setting, you risk overexposing the photograph. You lot can tell a photo is overexposed if information technology looks too bright when you load it into your computer.
Photography Life's blog mail provides a useful overview of exposure. In the example below, you can see that the photo is overexposed because of its effulgence and the overall lack of contrast.
On your digital camera, you can prepare the shutter speed when you lot accept your photographic camera gear up to manual. Your shutter speed will be displayed as a fraction, such every bit 1/1000 or 1/225. This refers to fractions of a second. A larger number on the bottom indicates a faster shutter speed.
Eliminate camera milkshake by shooting your makeup products at a shutter speed of 1/125 or higher and employ skilful lighting to make sure the image comes out looking sharp and in focus.
ISO
Your ISO setting refers to your camera's ability to capture calorie-free. If you lot've taken a film photography class or have ever shot with a 35mm film camera, the ISO is the equivalent of film speed. When you showtime shooting with a higher ISO, your photos finish up looking grainy.
You should be able to brighten or darken your photos using your F terminate and shutter speed settings. You don't really need to worry almost your ISO settings unless y'all're shooting in a darker environment. The ISO setting for product photography will be lower if you've adjusted your other settings and have gear up upwards your lighting.
Putting it into practice
Knowing the nuts of product photography can drag your website. You'll be able to shoot your ain basic inventory photos to load onto your shopping page. In this section of your site, you lot want your images to be clean and elementary.
Start with new, clean products and shoot them against a white background in natural light or with a calorie-free source that is placed at an angle instead of head-on. If you need to diffuse the light, consider a reflective screen or an attachment to place over your flash.
For blog posts and social media, get creative with your composition. Use colors and background elements that communicate your make personality just don't detract from the product itself. Be sure to use multiple models and shoot them under natural light or studio lighting to create authentic swatches.
You'll need to get familiar with your camera'southward settings. Practice photographing items in your dwelling or get out and take pictures in your neighborhood. Use different shutter speeds and F finish settings to acquire how each of them affects the end result.
Once you're comfortable with your photographic camera and its settings, yous'll exist ready to create your brand's unique aesthetic.
Source: https://www.constantcontact.com/blog/cosmetic-photography/
Posted by: pattisonminman.blogspot.com
0 Response to "How To Take Professional Makeup Pictures"
Post a Comment